Getting started
System requirements
2 GHz dual core Intel/AMD 64-bit processor
2 GiB RAM system memory (4 GiB recommended; before 0.7.0: 4 GiB minimum)
VGA capable of 800x600 screen resolution (1024x768 or more recommended)
Either a CD/DVD drive or a USB port for booting the installer media
On non-Macintosh hardware, a Raspberry Pi Keyboard and Hub is recommended as it allows the keyboard and system language to be detected automatically if it is attached while the system is starting up. On Macintosh hardware, the
prev-lang:kbdEFI variable is usually set and is used to detect the keyboard and system language. Note that the key left to the space bar is used as the Command key (Alt key on PC keyboards, Apple key on Apple keyboards).
Please refer to FreeBSD Hardware Compatibility for more information on individual components.
Downloading
The latest helloSystem release ISO image is available for download here:

Experimental and pre-release images are available for download here:

Important
Experimental images get built automatically whenever source code is committed. Not every build is tested. Builds marked as “Pre-Release” are strictly for developers, may be broken and may not even boot.
Creating Live Media
The ISO file needs to be written to a device, e.g., to a USB stick, in order to a computer being able to start from it. This will overwrite and destroy all data on that device.
If you are already running helloSystem, then you can use the built-in Create Live Media utility to download and write live media.
If you are not running helloSystem yet or would like to use the command line, the following command should work on all BSD flavors:
$ sudo dd if=<path to ISO file> of=/dev/daX bs=4m status=progress
On GNU-style systems (e.g., most Linux distributions), status=progress does not work and can be left away.
Ventoy
Ventoy is a tool that lets you boot the operating systems of multiple ISO files that are residing on the same disk, without the need to write the ISO to a physical device. Starting with version 1.0.62, Ventoy can boot helloSystem 0.7.0 and later.
If you are not running helloSystem yet, then please refer to the Ventoy documentation on how to create a bootable Ventoy disk (that you put your ISOs on) using Windows or Linux.
If you are already running helloSystem and would like to create a bootable Ventoy disk, please follow these steps instead since the Ventoy installation instructions since the Ventoy documentation only describes installation using Windows and Linux:
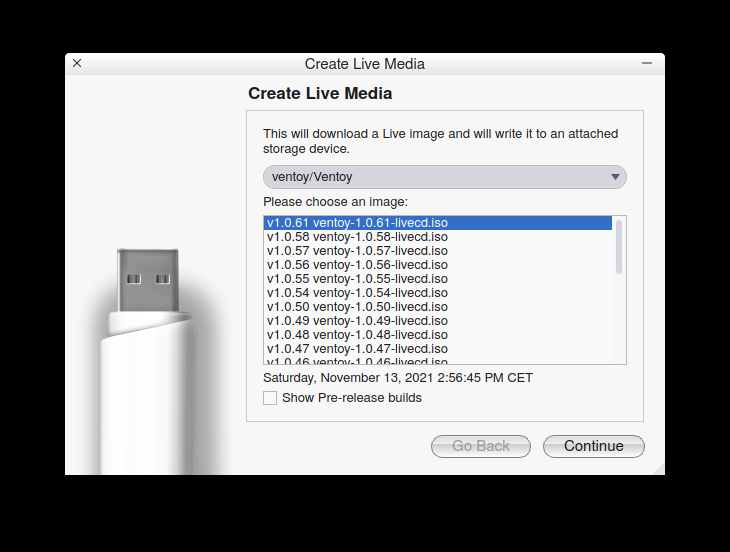
Run The Create Live Media utility in helloSystem
From the drop-down menu, select Ventoy. Select the latest version (at least 1.0.62), and create a Ventoy Live medium (a 1 GB USB stick is sufficient for this)
Boot from the Ventoy Live medium you just created, and use it to install Ventoy to a disk (a SSD with hundreds of GB of space is recommended if you want to store hundreds of different operating system ISOs)
At this point, you don’t need the Ventoy Live medium anymore (the 1 GB USB stick)
Put one or more helloSystem ISOs (and potentially ISOs of other operating systems supported by Ventoy) onto the Ventoy disk (the one with hundreds of GB of space)
Once a new version of Ventoy comes out, put the latest Ventoy Live ISO onto your Ventoy disk, just like any other operating system ISO. Boot it to update the Ventoy installation on the Ventoy disk itself (yes, it can update the disk it is running from)
Tested hardware
hello is known to boot to a graphical desktop on the following machines. Auxiliary functionality such as wireless networking, sound over HDMI, sleep, graphics acceleration, etc. has not yet been tested systematically.
helloSystem developers currently have access to the following hardware:
Framework Mainboard (11th Gen Intel® Core™)
Acer TravelMate B117
Acer Revo RL85
Dell Inc. OptiPlex 780
Please contact us if you would like to sponsor the project with a hardware donation. We are especially looking for Apple and Lenovo devices from the previous generations that should be available second-hand inexpensively.
To see Hardware Probes of systems running helloSystem, please see the helloSystem Hardware Database provided by bsd-hardware.info. It is reasonable to assume that every system listed there can at least successfully boot helloSystem. Auxiliary functionality such as wireless networking, sound over HDMI, sleep, graphics acceleration, etc. may or may not be working.
Networking hardware
Not all networking devices may be supported by FreeBSD yet. In those cases, you may want to consider using a USB based networking devices. helloSystem developers currently have access to the following USB based networking devices which are known to work:
USB 802.11n WLAN Adapters based on
ID 0bda:8176 Realtek Semiconductor Corp. RTL8188CUSUSB Wired Ethernet Adapters based on
ID 0b95:772b ASIX Electronics Corp. AX88772B
Detailed information on #FreeBSD wireless network card compatibility is available at https://wiki.freebsd.org/dev.
Virtualization environments
Note
We recommend running helloSystem on real hardware (“bare metal”) if possible. This should give you the best possible performance and hardware support.
Users have reported success in running helloSystem in the following virtualization environments:
VirtualBox host (on FreeBSD and on macOS), known to work in BIOS and EFI modes
VMware Workstation works in BIOS and EFI modes (see below)
QEMU host (on Linux), works in both BIOS and EFI modes (see below). Note that for acceptable performance, QEMU needs KVM which is currently not available on FreeBSD hosts yet
Parallels host, reported to work in EFI mode (see below)
Proxmox VE
Please note:
The VM needs to be 64-bit
The VM needs at least 2 GB of RAM
The VM needs at least 2 CPU cores
The boot process takes longer than you might expect; boot in verbose mode to see the details
For best results set EFI/UEFI boot mode (not BIOS)
Please report back about the results on your virtualization environment.
QEMU
Create an 8 GiB (or larger) hello.img image file on which you can install the system:
$ pwd
/home/user
$ mkdir -p .qemu/hello
$ fallocate -l $(( 8*1024*1024*1024 )) .qemu/hello/hello.img
Then, boot helloSystem:
$ qemu-system-x86_64 -machine type=q35,accel=kvm \
-enable-kvm -cpu host -smp 2 -m 4096 \
-device virtio-net,netdev=vmnic -netdev user,id=vmnic,hostfwd=tcp::5222-:22 \
-vga std -soundhw hda -no-quit \
-drive format=raw,file=${HOME}/.qemu/hello/hello.img \
-drive format=raw,file=${HOME}/Downloads/hello-0.4.0_0D26-FreeBSD-12.1-amd64.iso \
-boot menu=on
When QEMU starts, press esc and select 2 to boot the ISO.
Use the Install FreeBSD utility (System -> Applications -> Utilities -> Install FreeBSD) to install helloSystem to the disk image.
Then restart QEMU, you now remove the last two options from the above command.
Notes
The
hostfwd=option creates a port forward from your host port5222to the Qemu VM port22.Unfortunately the qemu-system-x86_64 USB tablet options do not work; you will need to press Ctrl+Alt+g to release the mouse pointer from the QEMU window
To make QEMU full screen, press Ctrl+Alt+F
To boot/install hello in UEFI mode, first install OVMF Open Virtual Machine Firmware on your host side. The package name for Fedora 32 is edk2-ovmf
Then add these two qemu-system-x86_64 options:
-bios /usr/share/edk2/ovmf/OVMF_CODE.fd \
-smbios type=0,vendor=0vendor,version=0version,date=0date,release=0.0,uefi=on \
Parallels
Select Hardware > Boot Order.
Expand Advanced Settings. Set BIOS to “EFI 64-bit” and in the Boot flags field, enter
vm.bios.efi=1.

Proxmox VE
Memory: 4GB (not ballooned)
Processors: 2 (1 socket 2 cores)
BIOS: OVMF (UEFI)
Display: Default (VGA)
Machine: q35
SATA Controller: VirtIO SATA for attaching virtual disk to (to install the system on)
CD Drive: helloSystem ISO
Hard Disk: At least 8GB Raw
Network Device: VirtIO
To set resolution, press F2 at boot to access OVMF settings. Select ‘Device Manager > OVMF Platform Configuration > Change Preferred’, save and reboot.
VMware Workstation
Tested on VMware Workstation 16.2.1
Installation issue
For best results while installing, please set your CPU to 1 socket, and no more than 4 cores
After installation, you can set the CPU socket and core count to your desire.
Memory: 4GB
Processors: 4 (1 socket, 4 cores)
Hard Disk: At least 8GB
Guest Operating System Version: FreeBSD 12 64-bit